

Chicks are curious creatures, so in addition to keeping them warm, clean, fed and watered, their housing needs to let them learn about their environment. If you want to have chickens that are easy to manage they should not be afraid of you – which means playing with them too. We have found that the perfect brooding box – needed for the first few weeks of a chick’s life – does not have to be complicated or expensive. It only needs a few modifications of a clean cardboard box… Here is how to make one.
Things you will need:
- Large cardboard box – the bigger, the better
- Newspaper, or any other kind of paper for lining the bottom
- Sheet of clear plastic sheeting (report cover or window from a toy package work well)
- Small containers for food and drink – best if these can’t be tipped over, or can be wired to the side
- Some dry sand or sawdust (but not sawdust from toxic treated timbers)
- Sticky tape
- knife
- 2 sets of nuts and bolts to make door locks (if available)
- 2 pieces of plastic cut to serve as latches (ice cream containers work well)
- A piece of small-mesh chicken wire for a rat-proof lid
What to do:
We keep our chicks in the centre of our house while they are young to keep them safe from cats, dogs and rats and get them used to us. The bigger the box, the better. We usually do this for 2-3 weeks before moving them outside to grow them up in baby housing till they are 2 months old.
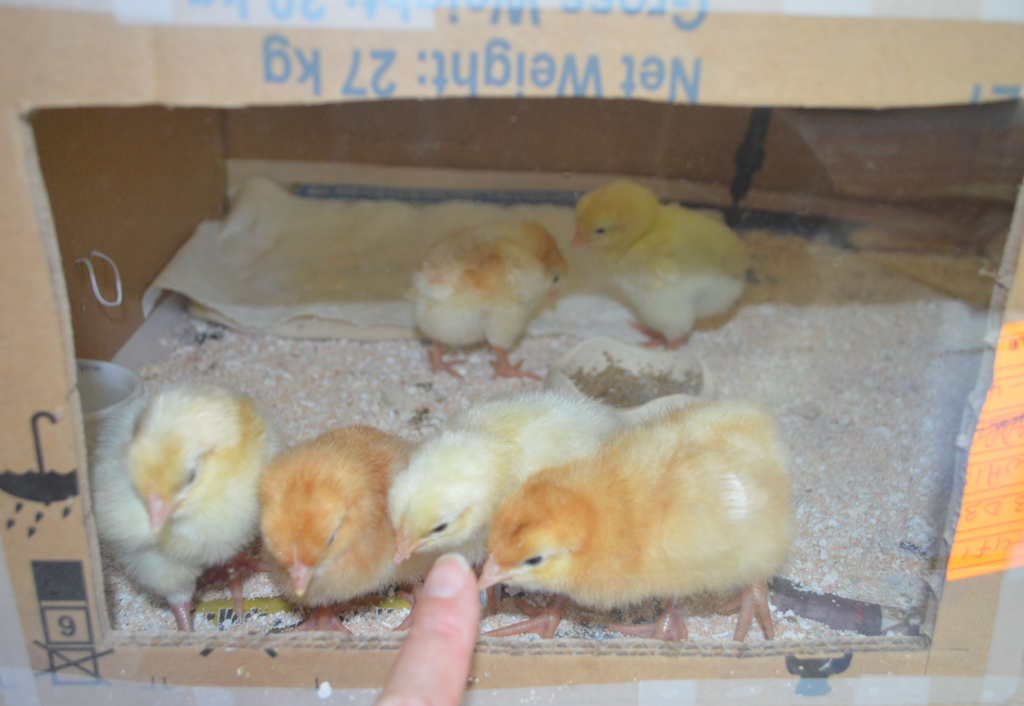
 Make a window: Take your large clean, dry cardboard box and cut off the lid pieces at the top. In the side of the box cut out a large square a centimetre or so smaller than the plastic sheet you have. The plastic sheet will form a window so your chicks can see out. Let them see what is going on around them and not be startled when you suddenly loom above them. This makes for much calmer chicks that don’t dive for cover shrieking every time you appear. Tape the plastic window sheet onto the box from the outside.
 Make a door: Then on one side of the box we cut a door hole carefully with a sharp knife. This should be about 12cm high x 7cm wide. Try not to damage the piece you remove because you will put it back to form the door. Tape one side of the door back onto the hole you cut to form a hinge. Tape will be needed on the inside and outside of the box. Make locks for the door: We usually make a lock to close the door and another to hold it open. The door is for the chicks – you can of course reach them from above. Letting them come out to explore and run around from time to time is a good idea – as long as cats and dogs can’t reach them ! Punch a small hole through your pieces of plastic to be used as latches, and another on either side of the door. Make sure they are positioned so that they can be rotated to either pin the door closed, or allow it to open. Using one of your bolts attach your latch to the box. Do the same on the other side to hold the door open. In this picture you can see the door and two latches (outlined in red), plus the window and a home-made feeder inside.
Prepare the box: Now your box has a window and door, line the bottom with several layers of paper and sprinkle the floor with about 1/2 cm of sand. The sand (or sawdust) will absorb moisture from their droppings and keep things clean enough to only need replacing every few days. Spread your chicken wire over the top to create a lid to keep other animals out of the box, especially at night. Bend the edges over the box and knit the corners to make a removable cover.

 Food and Drink:

Containers for food and drink can be as simple or as complicated as you like. Small plastic containers will serve OK, but they may be tipped over and walked in, or worse, chicks may sit in them and foul them. Luckily it is easy to make a small feed hopper out of a plastic sauce bottle and the plastic lid of a jar. This one shown here was made in about 10 minutes by cutting a notch out of the lip of the sauce bottle, and attaching it with fishing line to the larger jar lid. This will leave a small space for food to shake down from the sauce bottle into the dish. The whole thing is turned upside down and a hole cut in the top for easy refilling with dry starter crumbles. Then we hang it a few centimetres above the ground to stop the chicks scratching the food out and making it dirty.
We supply feed to our chicks 100% of the time – not in ‘meals’. They need to eat as much as they can to grow well and form their bodies. For the first 2 months we feed them chick starter crumbles from Pacific Feeds – that requires about 1kg of feed per chick – which we can supply to you at the time you get your chicks from us.
Getting your chicks:
The chicks will be ready for collection by those who ordered them in about a week. We keep them till they pass the stage of needing to be kept warm, so you don’t have to worry about any heat lamps. By then they are eating well and easy to care for. When you do come for your chicks you will need to bring the brooding box to take them away. Putting them in a sack in the basket of your bike will stress them and open them to problems.